Thursday, November 26, 2015

A new seat and and engine bracket

Well maybe some of the waiting is over.  I received an engine bracket this week so I should be able to bring the scoot down from the rafters and see how a 125cc engine from the 60s fits in to the body.  If it seems to fit OK I will start on a rebuild of that engine and probably upgrade to a 135 or so cc for a little bit more power.  I know it will not fit perfectly and will require some frame modifications but this is not a show scoot so that does not bother me a whole lot.  Here is a picture of the engine mounting bracket.


I do not have a ton of space in my garage/workshop since I just started dismantling a 1974 125 Primavera and I am still working on my Allstate rebuild.  I will have to see if maybe I can rearrange some things.

I also received a new seat cover.  The idea of having the cobbler fix the old cover did not work out. The leather was too far gone and the repair job looked terrible and would not last.  So I purchased a new cover and put it on the saddle frame today.  It looks pretty good.  Somewhere I have misplaced the grab bar for the pinion seat???  I am certain it is in the garage but I can not find it in either box of parts I have for this project...too much stuff.  Hopefully it will turn up as it was a nice old piece in very good shape.

Here are two photos of the new seat cover.


Saturday, October 24, 2015

Oh the Shame

So I am waiting to decide which way to go with the engine.  Spend money rebuilding and sourcing parts for the old wide frame engine I purchased in April, or use the engine bracket to install a newer more powerful and modern engine.

Problem is that I am having a hard time securing the engine bracket.  So without the bracket, which will allow me to test fit a newer engine and make a decision based on the body modifications I need to make the project has come to a halt.

Since space on my garage floor is at a premium any project which comes to a halt gets relegated to the rafters.  Hopefully she will not be hanging up there too long?!


Monday, September 21, 2015

New cables for the frame part 2

OK finished the frame cable install today and here is the latest set of photos and commentary.

So yesterday I was talking about how much of a challenge running the new cables was (especially the shifter cables) due to the individual pipe/channels that were designed in this scoot.   Here is a picture which shows the main problem area.


This is hardly recognizable unless you are looking up into the front fork tube of a scoot from this generation but here is what is going on.  This is the bottom of the front fork tube.  The shiny ring is where the bottom bearings will run.  In the bottom center of the photo just above the red spot of primer you can see the clutch cable which runs freely at this point down the fork tube.  Just to the right of that you can see the steel tube which encases the two shifter cables and at this point also the throttle cable.  With all three of those cables running inside of that tube it is very tight and the cables do not want to move at all.   This is made worse by the fact that new modern cables and housings are slightly larger than  the old ones so the space is just crammed full.  At the point of this photo you can see a hole in that steel tube.  I have a copper wire running from outside to inside and in the background you can see one of the shifter cables which remains inside.  This hole is where the throttle cable exits the tube and continues to the back of the scoot on its own course.  The two shifter cables remain inside the tube for the rest of the journey to the back of the bike.  As the throttle cable comes out of the tube at this point is gets pinched trying to exit the tube.  Not so pinched that it inhibits the inner from moving freely but pinched enough that the throttle cable outer can not be slid up and down.  Making any adjustments to the throttle cable is very difficult. Because of all of this complication there is no way the front fork can be installed until of the electrics, the engine and cables are set.  So this scoot is going to be in a waiting pattern for a while until I solve the engine question.

In yesterday's post I talked about putting grease on the outers to help the cables navigate these tight spaces.  Here is a photo of the greased cable outer ready to enter the tight down tube in the front fork.  After getting the first cable down the tube the second one was much easier due to the grease.  It will also protect the cables inside the tube over time.


Also yesterday I talked about clamping a vice grip on the end f the copper guide wire to secure the two outers tightly together in one train.  Forget that!  A far more simple and very effective answer is pictured here:


After a lot of pulling and teasing the frame cables were complete.


I have the brake cable nearly done as well and will post a few photos of that very soon.  A few quirks on that install as well mostly related to the fact that the new cables are larger in diameter than the original cables.


Sunday, September 20, 2015

New cables for the frame part 1

So yesterday I ran the cables in the headset and today I started to run the cables in the frame.  This is not an easy task and will need to be completed next time I am in the garage.  Let's first start with the before pictures showing the old cables at the top:


And at the bottom.


And here is a close up of the exact spot where the frame cables exit the bottom of the scooter frame in preparation for being connected to the shifter, clutch and brake.  You can see looking at this picture that unlike the 60s and 70s scooter where the cables run willy nilly inside the floorboard these cables each have a distinct channel in which they run.  For the shifter cables in particular that channel is a steel tube which runs all the way up to the headset.  And it is tight, and it turns, and it gets crusty.  In other words these cables were stuck.  STUCK in place. It took a lot of WD40 being sprayed into this tube and grease being applied to the outside of the new outer as it was being pulled in to place to get things moving.  I attached a vice grip on this end and pulled like it was nobody's business.  Finally the cable broke loose and began to slide out of the tube.  Using the copper wire trick described yesterday I was able to apply a ton of leverage as I pulled.  If it were not for that copper wire the cables themselves would have simply stretched out of shape and deformed (possibly even snapped somewhere in the middle of the tube) making life very sad.   


In the end they will all look great.  Look for a final picture in the next day or so.

Saturday, September 19, 2015

Font end cable installations

I am getting prepared to finish building the front fork and re-install it on to the scoot.  However, before that can be done the cabling and wiring need to be finished.  Maybe I could do the cables and wires after the front fork is on but all of those lines run down the font tube in the frame and it seems it will be a whole lot easier to get the cables and wires complete before the fork goes on.

So today we started with the cables.  I have lots of pictures to show how I run new cables which may or may not prove helpful to anyone who might ever look at this page.  Here we go.

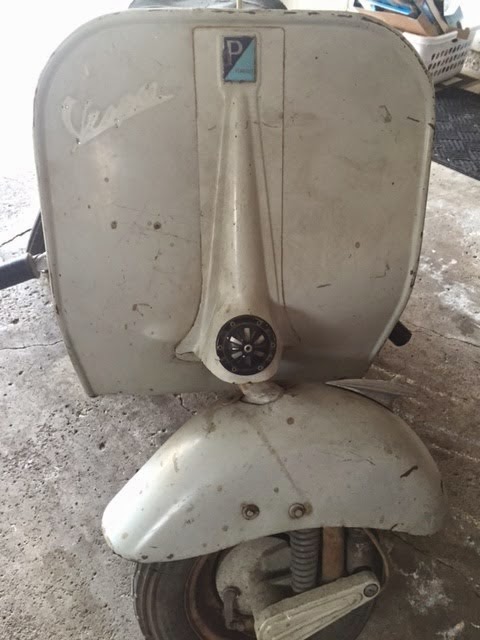
First a photo of all the bits.  In the photo you can see the parts which are involved.  The fork and the hub are central as well as the handlebars.  I took a long look at the handlebars to make sure I had the proper connectors on the ends of the cables.  More photos on that later.


I started with the front brake cable.  Here is a photo of the ends of the old cable outers coming out of the top of the fork.  I have removed the inners at this time.  The speedo cable is the one on the bottom with the silver tip.  The top cable is the brake outer.


Once I pull the cable inners I will thread a piece of copper wire (romex) which is 2.5x the length of the existing outer cable down the outer.  It looks like this.  So the copper wire now runs all the way through the existing outer which is still located in the fork.


Since the copper wire is 2.5x the length of the existing outer I then thread the new outer on the copper wire and butt the new outer up against the top of the old outer.  Imagine two cars of a train butted right up against each other on one track.  The two cars are the two outers and the track is the copper wire.  Looks like this.


Now I have the two outers running together on the same long piece of copper wire.  At the top end of the new outer I clamp a vice grip.  This locks the copper wire in place making sure the wire will not pull through the two outers.  The two outers are now linked as one on the copper wire.  Like this.


Now go the to lower end of the old existing outer and start pulling the old outer down and out of the fork.  Grab the outer firmly even kink it in your hand so it is pinching the copper wire which is running inside.  The copper wire is your pulling device moving the old outer down and out and bringing the new outer right behind.  Pull, wiggle, back and forth. pull wiggle.  And after a minute or so the old outer has made it all the way out of the fork.  And low and behold the bottom end of the new outer is right behind.  MAKE SURE THE COPPER WIRE DOES NOT BREAK FREE OF THE VICE GRIP AND PULL THROUGH.  IF YOU LOSE THE COPPER WIRE CONNECTING THE TWO OUTERS YOU ARE SCREWED.

Here is a picture of the new brake cable outer installed coming out of the bottom of the fork. I have the old brake cable outer lying alongside for illustration.  Without using the old outer as a guide and the copper wire as a pulling tool I know of no way you would ever get the new outer through the tight confines and twists of this fork.  The whole operation maybe took 5 minutes. 


Here is the new brake cable outer extending from the top of the front fork with the old outer alongside.  The old speedo cable is still in place running down the inside of the fork.  Installing the inner cable is as simple as some grease and slipping the inner cable into the outer housing.


Here are the tops of the new and the old brake cable lying alongside each other,  Note the different cable ends.  This is the end which fits inside the brake lever.  The old shape was kind of a conical lead deal and the new shapes are the more traditional bronze barrels.  Both fit just fine into the lever as they should.  I will admit that the opening in the lever is worn in a distinct oval shape due to the old cable end.  I may need new levers when I get to that step.


For the speedo cable I had to do a little rebuilding.  I did not purchase a new speedo cable so I took the old inner and the ends of the old cable and installed them in to a new outer housing.  Here is a photo of the new housing with the old inner which will slip inside.  I simply removed the barrel and threaded nut from the bottom of the old speedo cable and installed them on the bottom of the new speedo outer housing.  I will attach the silver tip from the top of the old speedo cable in the same fashion to the top of the new speedo outer.  That will happen when I rebuild the headset in who knows how many months.


And finally here are two shots of the new cables exiting the top and the bottom of the fork.  All in all it is a pretty tidy job.


Monday, September 7, 2015

Frame cleaning is finished

Finally finished cleaning the frame.  In between landscaping projects, getting kids off to college, dislocating my shoulder and buying a '73 Primavera 125 smallie.  It has been a busy summer and since this project is on the long term list it does fall to the bottom all to often.

However, the other day I received some cables and bearings so that I could begin working on rebuilding the front fork and then the headset.  With that motivation I took some time this Labor Day weekend to finally finish the frame cleaning which I had been procrastinating.  

It is not perfect and that was never my intention but the rust has been mitigated and the significant amounts of road grease and grime are all gone.  The scooter has had all old surface grease removed with a gentle degreaser and then a coat of Penetrol was applied to help renew the older paint.  This is the same process I used on the first parts of the clean-up earlier in the summer.  As an FYI on those first few sections no new rust has begun to appear even on the bare metal areas.  Partly due to the favorable Colorado climate during the warm and dry summer months and partly due to the  protections offered by the Penetrol and wax which had been applied.  As long as I provide regular maintenance on these exposed areas rust should not be a problem.  This will allow me to leave the original paint and not have to go in to an entire repaint process for the foreseeable future.

Here are the pictures of the final frame cleaning stages.

Clean engine side rear frame.  I also took off those little wires that hold on the engine side cowl and sanded them down to bare metal and then hit them with a coat of Rustoleum clear coat


Hear is the glove box side before treatment with Evapo Rust to mitigate most of the surface rust in this area.


Because it was impossible to dunk this section and the curves made it impossible to puddle the EvapoRust product I used paper towels soaked in the rust remover and then covered those towels with plastic wrap.  I would re-moisten the towels every so often to keep the process moving forward.


In the end you can see the result was very satisfactory.  A small amount of rust remains along the bottom lip of the frame but nothing major and it is not threatening the structure of the scoot at this time.


Here is the back end of the frame before and after cleaning.  I did not remove any rust is this section leaving the few small areas by the license plate holder and the tail light gasket as they were.


And finally the right floorboard with all rust removed and bare metal treated to prevent or significantly slow future rust problems.


Next we move on to rebuilding the front fork and headset.

Monday, August 10, 2015

Rebuilt front suspension

OK the front suspension is rebuilt.  All the bearings are in good order and covered with fresh grease. Axle and hub are good.  Repainted spring and a new shock.  All spinning true as far as I can tell at this point.  Placed the hub on for one of the photos.

Next shipment of parts will include the bearings for the front fork and some cables.   Once I finish cleaning up the frame the front suspension will be ready to go back on the scoot with a tire.  Then it will start looking a bit like a real scooter.  Before long I will need to begin looking seriously at the engine...


Sunday, August 9, 2015

Clean underside

July was a slow month.  Summer weather finds me outside more than in the garage.  But still collecting parts and moving forward.  Today I finally finished cleaning all the grease from the bottom of the scoot.  I have been using GOJO hand cleaner which is gentle enough not to harm the paint or the primer but tough enough to get the grease really loosened up.  With several applications I was down to a good clean surface.

On the bottom of the floorboard I applied a coat of Penetrol and in the rear wheel well I sprayed some rust treatment to address the very light rust which was forming in the well.  All in all it looks very good.  I still need to finish cleaning the upper side of the scoot and complete the rust removal process.  The last few areas of rust are large surface areas and tricky to submerge in Rustoleum.

I am almost done rebuilding the front suspension and expect I will have photos of that part of the scoot very soon.

Underside of the floorboard treated with Penetrol.  This is solid metal perfect for the rebuild.


Inside the rear wheel well.  All cleaned up and light rust is treated with a rust treatment prohibitory spray.


Thursday, July 23, 2015

Clean front fork and swingarm

Two posts ago I mentioned that I was cleaning up the front fork.  I never posted pictures of that finished work so here it is.  The first two photos show the front fork and swingarm before and after after rust was removed.  

You can see the fork cleaned up very nicely.  The original paint and primer came through like a champ.

The swingarm is aluminum so no rust just some cleaning and grease removal.  I then hit both pieces with some clear coat making sure not to get the clear coat in to the bearing races.  The bearings were all very solid and spinning level so need to pull or replace those.  The roller bearings for the front hub (underneath that large 22mm nut) will both need to be reseated slightly as they came off their respective bases just a bit when removing the hub itself.  A little love tap on reassembly will take care of that detail.  The needle bearings in the swingarm pivot however were a different story...see below.


So inside the swingarm pivot at the end of the fork are these nifty needle bearings.  This kind of bearing consists of the bearing shell (which you can see as the center circle) and then the needle bearings themselves.  The shell is constructed so there is a lip on each end.  The needle bearings roll around held in place by the lips on either end of the shell and the swingarm pivot which goes through the center.  But when you drive out the pivot the bearings are free to roam about as they please.  This normally means needle bearings all over the place.  If you are lucky your grease has held the needles all in place so they can be removed  cleaned and repacked.  In my case that is exactly what happened.  18 needles per bearing, one bearing on each side of the opening so a total of 36 needle bearings to be individually refitted back into their respective shells.  Once the needle bearings are in place carefully drive the swingarm pivot back through the hole and you should have a functioning swingarm pivot.


Wednesday, July 22, 2015

Cleaning and prep...tire rims

When you get an old scooter body there is a lot of cleaning and prep.  When you have a job and a family and a house to take care of you do not  have all the time in the world to spend with your scoots. I have also been distracted by some work on my Allstate project and regular maintenance on my VNB.

Anyway this project is moving forward and every part I take off and clean is one more part ready for reassembly.

I have been working on the front fork getting all the bearings out and cleaning up the swing arm assembly.  That is mostly done with new bearings on order from SIP and potential reassembly in the not too distant future.  I still have a fair amount of work to do cleaning the frame including some rust removal.  That will be finished up after I get all the outlying pieces taken care of and off the floor of my garage.

So here are a few photos of the latest part to be cleaned up and ready for rebuild.  You remember the rims which were rusty and the paint was falling off and unprotected.  Well I finished removing the rust with my favorite Evaporust product.  I then gently cleaned and dried the remaining paint and coated that with several layers of clear coat to seal the paint which remained and prevent the rust from returning.  

On the inside of the rims I spent considerable time grinding off old rust and rubber which had been stuck to the rims for years.  This was done with a drill and wire brush.  Once I got the surface down to a smooth enough condition that I felt a rubber inner tube would be OK resting against the rim I coated the inner edges of the rim with a rust sealer/converter to help prevents the insides of the rims from corroding too quickly in the future.

Below you can see the before and after pictures.   Rust is gone, paint is sealed, metal interiors are sealed and these rims are ready for tires and mounting.  The second pair was a bit more beat up and took more work on the interior to get a smooth surface for the tube, but it ended up looking nearly identical to this rim when all was said and done.  Once I slip some new 8" black-walls on these rims they will look great.

This is before:


This is after, ready for tires:


Monday, July 6, 2015

Front suspension cleaning

Starting to get serious about cleaning the front end suspension and fork.  Here are a few pictures of the progress.

This is the front spring and shock before cleaning.  For greasy parts like these I lather them up with GOJO hand cleaner.  The GOJO really gets after the grease and loosens it up for easy removal with a rag or towel or water and brush whatever technique is appropriate for the piece.  Because I did not want to introduce water to these pieces I wiped them down with rags once the Gojo did the hard work.


I did nothing to the shock after cleaning off the grease.  There is still some decent resistance so I think I will put it back on the scoot and see how the front end responds.  If it is too bouncy then I will replace the shock later.  I rarely use the front brakes so I suspect it will be fine.  I hit the spring with some new aluminum color Rustoleum paint and it looks super.  The spring will probably be the best looking part on the finished scoot.  I will likely do the back spring the same way so they match on the final product.


Here is the front suspension half disassembled.  Next off is the swingarm pivot.  Then remove the axle and finally get down to some rust removal.


And here is the swingarm pivot removed.  I took this photo just in case there is any question how these pieces go back together during reassembly.  This is the exact order in which the various washers will go back on to the swingarm pivot post during rebuild.  They all cleaned up very nicely and will be reusable. 


Monday, June 29, 2015

repaired headlamp and glove box cowl

Making repairs on more parts.  On the glove box cowl there was a fair amount of rust in the bottom edge.  Pretty common as water pools in this location.  So I cleaned it up and applied some rust sealant.  Here are a few photos;  one after cleaning and knocking off the major rust and one after the rust sealant had cured for 24 hours.  On top of the rust sealant I sprayed a few coats of the Rustoleum clear.


Here is a photo of the repaired headlamp lens.  The reflector had been rusty and peeling.  I cleaned that up and hit it with a coat of Rustoleum mirror reflective silver.  Looks pretty darn good and will be ready for rebuild and a new bulb.


Sunday, June 28, 2015

Clear coats, Penetrol and other finishing ideas

As I get various parts cleaned and ready for reassembly I am trying to finish them up, move them to the side and then turn my attention to the next parts of the project.

To that end I spent some time this weekend playing around with  a few finishing ideas for the wheels, cowls and mudguard  Here are some pictures and end results.

If you read the blog entry when I was pulling the tires from the rims you will have seen this picture already.  The tires were shot but the rims looked they they could be saved.


Once the tires were removed the rims were soaked in Evapo-rust.  I think they came out looking pretty good.  There was some missing paint where the rust had eaten it away but lots of good paint remained.  I hit the cleaned up rims with a few coats of satin clear enamel to seal up the bare metal parts and protect what paint was remaining.  On the inside I worked the rust down to a manageable level and used a Dremel to sand down the surface of the rims so the tire and inner tubes will have smooth contact with the rim itself.  I then coated the inside of the rim with a permatex rust converter to help prevent future rust build up. The rims are ready to go on the shelf for now and wait for some new tires. 


As I finish cleaning various body parts I am finishing off the painted sides with several coats of Penetrol.  Penetrol has the viscosity to penetrate the single stage paint helping to refresh its color and integrity while also providing a good shine as can be seen below.  I have heard some complain that Penetrol remains tacky but I have never had that experience.  I live in Colorado where the climate is high and dry and this product hardens up just fine for a nice protective finish.